This is what I have been working on the past little while.
My Mother in-law had given me a lot of lace she had left over from when she used to sew wedding gowns and such. I also already had a lot of lace ribbons etc that I wanted to use.
So this is what i came up with. I had previously made a journal from scratch, here.
I started by cutting the pages to size, since I was using canvas boards as the front & back covers. I then dyed the pages with tea - this probably took the greatest amount of time. I've shown some here so you can see the variations in the pages.
Click any image to enlarge.
I covered the canvas boards and spine in a cream coloured fabric I had. (Sorry forgot to take a pic of this step)
I did my best to reflatten the pages under a huge pile of books over night. They didn't get perfectly flat, but I think this gives them character.
I then created a hole template, punched holes, stitched the signatures (groups of pages) together, glued spine & added binding fabric using the technique in this
video.
I glued a ruffled lace ribbon around the front cover edge. I also covered the spine & back cover in a pc of lace.
In between all these steps, I cut out a pc of muslin the same size as the front cover and started designing the cover.
I glued a pc of muslin to a pc of paper and printed the image of the young girl right to the muslin. I then gathered bits and pcs of lace and ribbon I wanted to use on the cover. I posted a pic on twitter asking for advice and/or suggestions, all thought it looked good as is, so I then started gluing down my design.
I then glued the binding fabrics to the inside covers of the journal.
I then realized I had forgotten a closure for the journal and glued down 2 ribbons as closure ties. And the final step was to add end pages to the front & back covers.
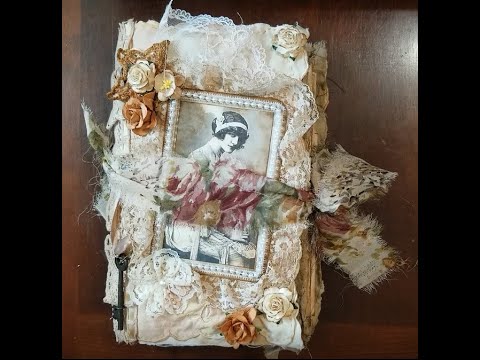
The final product. I used 10 different laces, 3 ribbons, 2 appliques and a pearl :)
I am thinking to sell this on my Etsy shop (not yet open) but have no clue how much to price it for. It is 5x7 inches in size. Can any of my readers with Etsy shops give me a clue? What would you pay for it?
Although I thoroughly enjoyed making this, it is long and tedious. I am thinking instead to just make fabric & lace covers for hard-bound store bought journals, that way the person can reuse the covers once the journal is full. Thoughts?